Manage Prisma records from Discord

I'm a software developer based in the United Arab Emirates 🇦🇪. I enjoy coding open-source projects that solve unique, out-of-the-box problems. I love combining my hobbies like design, coding and building various cool projects with Raspberry Pi and IoT. Obsessed with Automation and Software Development.
Hello buddy😊! Today we will use a Discord bot powered by Discord.py to manage our Prisma records, but in this article, we will pretend that we got a shop and we use the Discord.py bot to manage the sale records, which is the example we'll work with today. So let's go🚀!
Working on our Prisma/Next.js API
Start by creating a Next.js project:
npx create-next-app
Now, move into the directory and install Prisma into the project:
cd prisma-with-discord
yarn add prisma @prisma/client
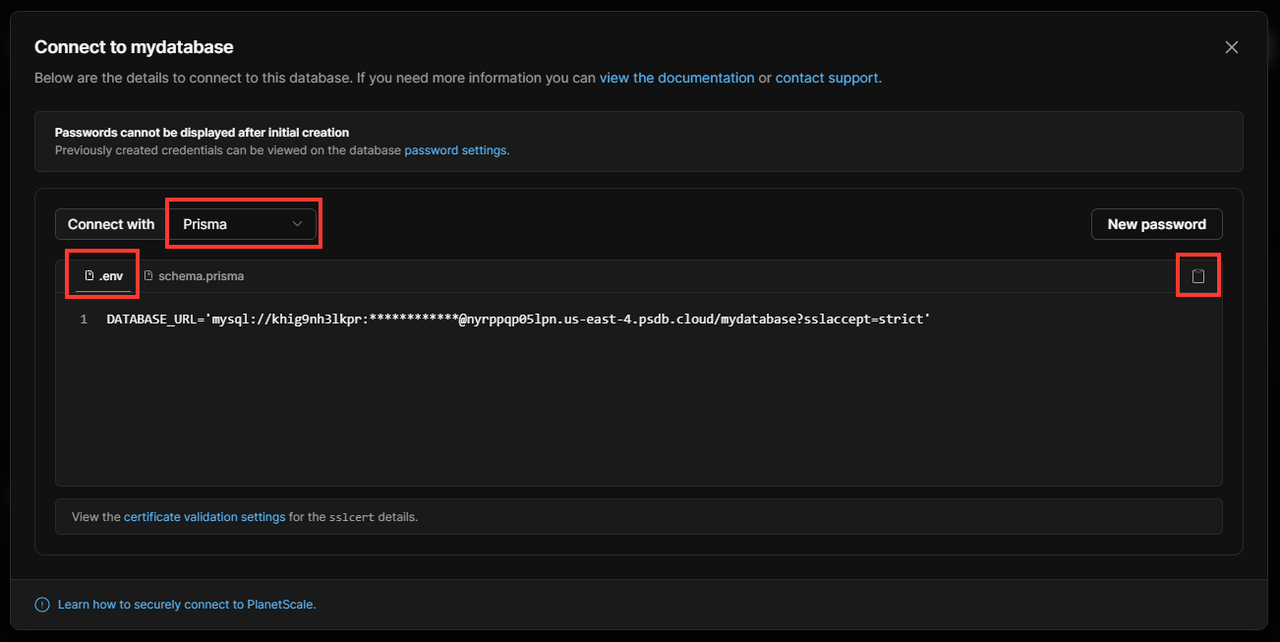
Now, let's get Prisma ready, go to PlanetScale.com which is a free MySQL database provider, sign up and create a database, once the database is ready, click Connect and get the credentials:
Now run:
yarn prisma init
Now paste the .env file you copied from PlanetScale and the same for the prisma/schema.prisma.
So what we are doing that the Discord bot is able to manage records in a Prisma table/model like adding or deleting a record! Which means we need probably 3 API files, add_record, delete_record, view_records, and edit_record.
So now we will make a model in schema.prisma to use it for our testing:
model Sale {
  id Int @id @default(autoincrement())
  item String
  price Float
  currency String
  buyer String
}
Now this is an example of a store sale where we store the sale id, the item sold, the price, and currency of the price, and the buyer who bought the item.
Let's sync in our database:
yarn prisma db push
Here comes the fun part! We will work on the 4 API files, so first let's start with pages/api/add_record.js:
import { PrismaClient } from "@prisma/client"

export default function handler(req, res) {
    const prisma = new PrismaClient()

    const { item, price, currency, buyer } = req.body
    if (!item || !price || !currency || !buyer) {
        res.status(400).json({ message: 'Missing `item`, `price`, `currency` or `buyer`' })
        return
    }
    prisma.sale.create({
        data: {
            item: item,
            price: price,
            currency: currency,
            buyer: buyer
        }
    }).then((result) => {
        res.status(200).json({ message: 'Sale/record created successfully' })
    }
    ).catch((error) => {
        res.status(500).json({ message: 'Error occured while creating the sale record' })
    }
    ).finally(async () => {
        await prisma.$disconnect()
    }
    )
}
So what we are doing here is storing the item, price, currency, and buyer by getting their values from req.body, after that, if one of the 4 parameters are missing, we return an error and we won't proceed into the next step, if we got the 4 parameters, we create the sale record with the data provided and either return a success message or a error message.
Now, let's be able to edit records, so create a file pages/api/edit_record.js:
import { PrismaClient } from "@prisma/client"

export default function handler(req, res) {
    const prisma = new PrismaClient()

    const { sale_id, what_to_update, new_value } = req.body
    if (!sale_id || !what_to_update || !new_value) {
        res.status(400).json({ message: 'Missing `sale_id`, `what_to_update` or `new_value`' })
        return
    }
    prisma.sale.update({
        where: {
            id: sale_id
        },
        data: {
            [what_to_update]: new_value
        }
    }).then((result) => {
        res.status(200).json({ message: 'Sale/record updated successfully' })
    }
    ).catch((error) => {
      res.status(500).json({ message: 'Error occured while updating the sale record, what you can update is `item`, `price`, `currency` or `buyer`' })
    }
    ).finally(async () => {
        await prisma.$disconnect()
    }
    )
}
So what we are doing here as always we are looking for the id of the sale/record, what_to_update which can be for example currency or buyer, with new_value which is the new value for that thing to update.
Also, I might want to be able to delete a record, so create a file pages/api/delete_record.js and paste the following code below:
import { PrismaClient } from '@prisma/client'

export default function handler(req, res) {
    const prisma = new PrismaClient()

    const { sale_id } = req.body
    if (!sale_id) {
        res.status(400).json({ message: 'Missing `sale_id`' })
        return
    }
    prisma.sale.delete({
        where: {
            id: sale_id
        }
    }).then((result) => {
        res.status(200).json({ message: 'Sale/record deleted successfully' })
    }
    ).catch((error) => {
        res.status(500).json({ message: 'Error occured while deleting the sale record' })
    }
    ).finally(async () => {
        await prisma.$disconnect()
    }
    )
}
Now, simply here we are looking for the sale (record in the model/table) using the id because it's unique, so it's impossible to get 2 or more results for a query, and then if we found it, we delete it, if not, we return an error.
Last but not least, let's be able to view records/sales, create a file in pages/api called view_records.js:
import { PrismaClient } from "@prisma/client"

export default function handler(req, res) {
  const prisma = new PrismaClient()

  prisma.sale.findMany().then((result) => {
    res.status(200).json(result)
  }
  ).catch((error) => {
    res.status(500).json({ message: 'Error occured while listing all sales' })
  }
  ).finally(async () => {
    await prisma.$disconnect()
  }
  )
}
So it's very simple what we are doing here, we are just not waiting for any parameters, just listing all the sale records and sending in JSON!
Creating the Discord bot using Discord.py
First go to https://discord.com/developers/applications and create an application:
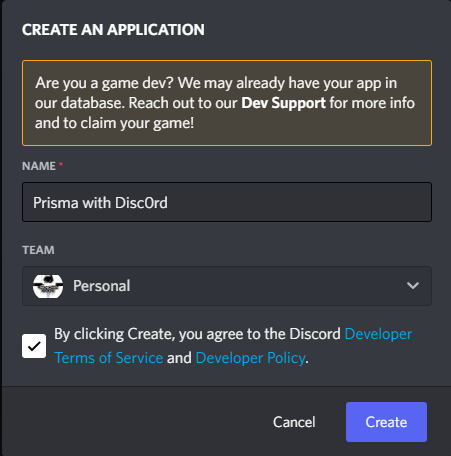
(the reason why I didn't write "Discord", but instead "Disc0rd" because it won't allow including "Discord" in the bot's name for security purposes, but this is just for educational purposes and we aren't trying to hack anyone)
Click on Bot and Build a bot:
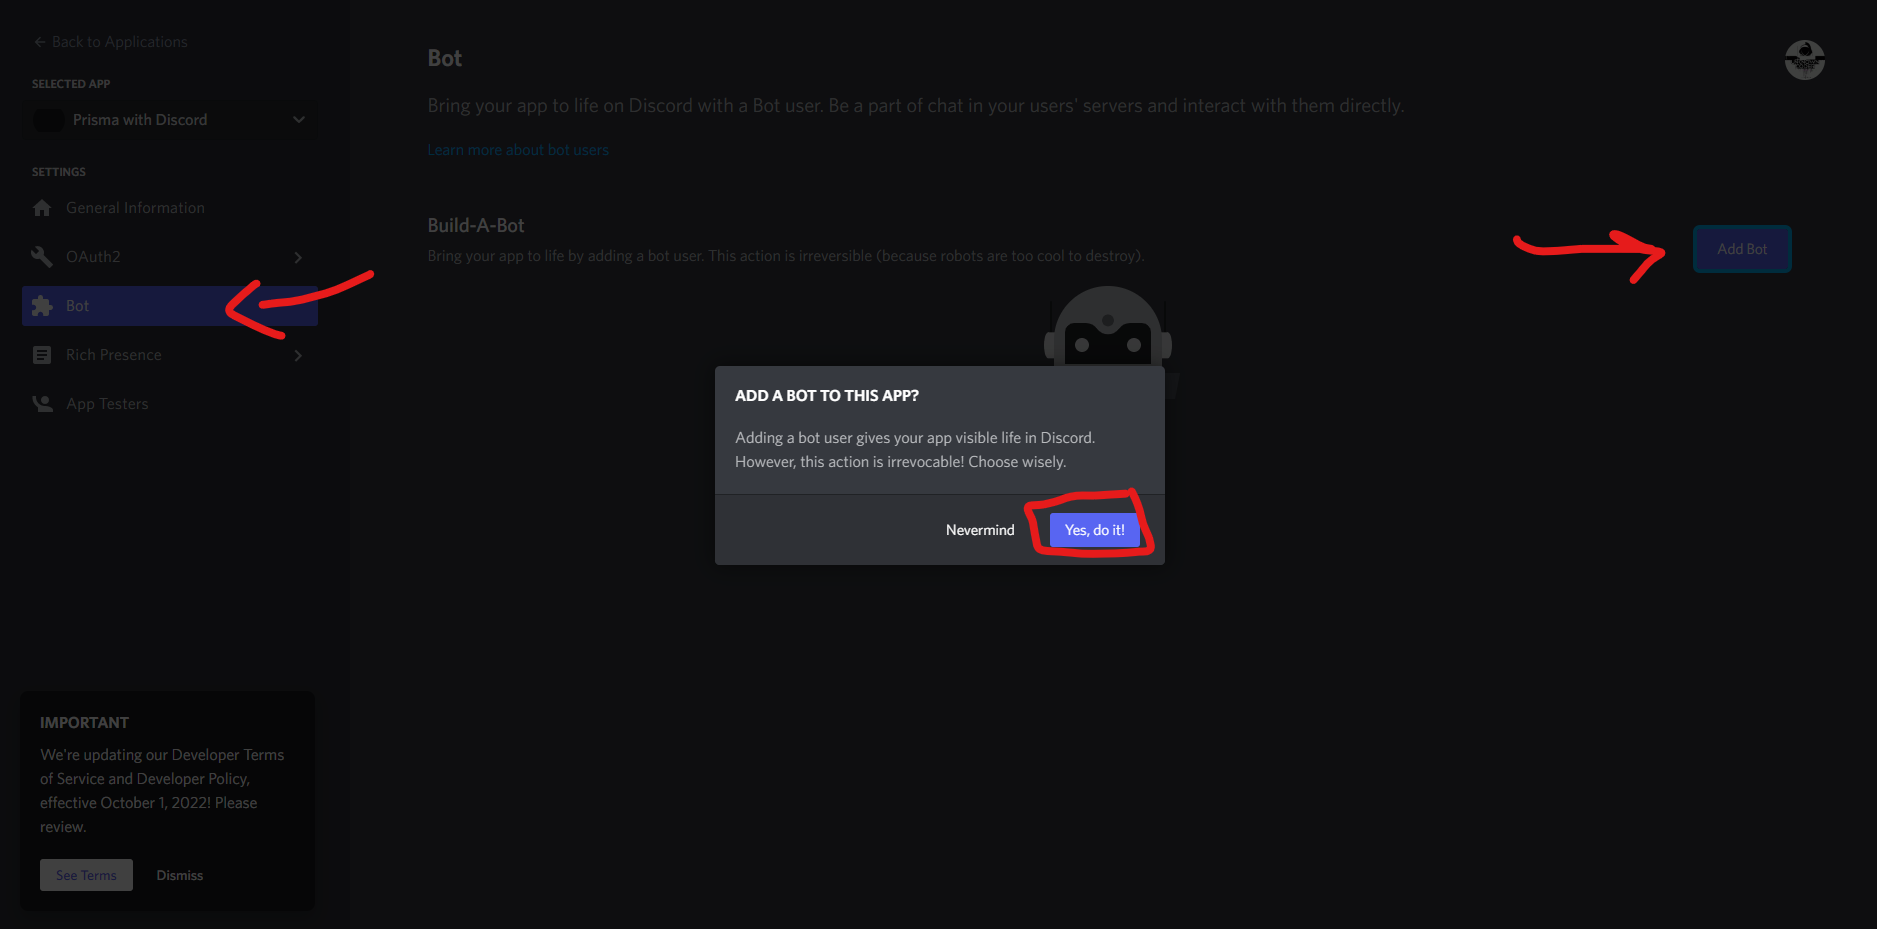
Click reset token and carefully copy the token!
Now, let's run these 3 commands to get setup!
mkdir discord_bot
touch .env
touch main.py
Now open your .env file and put in your TOKEN just like this:
TOKEN=ABC123
After the TOKEN is ready to use, let's start working on the main code for the bot:
import discord
from discord.ext import commands
import requests
import os
import dotenv

dotenv.load_dotenv()
intents = discord.Intents.all()
bot = commands.Bot(command_prefix='!', description="A bot allows you to manage your Prisma records", intents=intents)


@bot.event
async def on_ready():
    print(f'Logged in as {bot.user} (ID: {bot.user.id})')
    print('------')


@bot.command()
async def add(ctx, item: str, price: float, currency: str, buyer: str):
    r = requests.post('http://localhost:3000/api/add_record', json={"item": item, "price": price, "currency": currency, "buyer": buyer})
    await ctx.send(r.json()["message"])

@bot.command()
async def delete(ctx, sale_id: int):
    r = requests.post('http://localhost:3000/api/delete_record', json={"sale_id": sale_id})
    await ctx.send(r.json()["message"])

@bot.command()
async def edit(ctx, sale_id: int, what_to_update: str, new_value: str):
    if what_to_update == "price":
        new_value = float(new_value)
    r = requests.post('http://localhost:3000/api/edit_record', json={"sale_id": sale_id, "what_to_update": what_to_update, "new_value": new_value})
    await ctx.send(r.json()["message"])

@bot.command()
async def view(ctx):
    r = requests.get('http://localhost:3000/api/view_records', json={})
    for item in r.json():
        await ctx.send(f"Sale ID: `{item['id']}` - Item: `{item['item']}` - Price: `{item['price']}` - Currency: `{item['currency']}` - Buyer: `{item['buyer']}`")

bot.run(os.getenv("TOKEN"))
So we are first making some imports for some libraries/modules at the top and then we are creating the Discord Bot Client with using all the intents, it's not recommended to always use all intents but just for testing in this case!
After that we set the bot description, intents, and command_prefix.
Now we start by on_ready to print in the console that the bot is ready to use, after that we start creating commands with @bot.command() and using:
async def <command>(ctx, <arguments ...>):
Here we use this way to create a command, for example I would make the edit command, so I will replace <command> with edit, and in the parentheses we would always start with ctx after that we will put our arguments we need in order with their value type, like this:
(ctx, sale_id: int, what_to_update: str, new_value: str)
And then we send a JSON GET/POST (one of them, both would work) and then return the response.
So let's test it together! Here is a quick 3-minute video for you!
The End!
Thanks for reading this article, I hope you learned new things because I also invested my time writing this :)